|
|
|
This thread is locked; no one can reply to it.

|
1
2
|
| Tonight, there will be shadows |
|
Mark Oates
Member #1,146
March 2001
 |
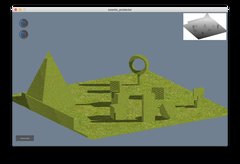
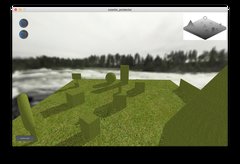
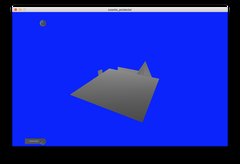
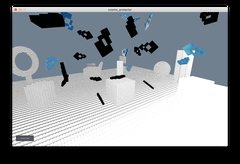
I have a goal tonight to get real-time shadows into my 3D arsenal. Specifically, I'll be running through this tutorial. I believe I have everything else setup and have a good shot. I'll be keeping an update log here, so please comment generously so I'm not stuck updating my last post with edits? Thanks! Ok, first order of business... I need a nice simple "world" model that is good for checking shadows, so I'm off to blender to throw something together. EDIT 1 EDIT 2 EDIT 3 EDIT 4
1GLuint FramebufferName = 0;
2 bool initialize()
3 //bool make_shadow_texture()
4 {
5 // The framebuffer, which regroups 0, 1, or more textures, and 0 or 1 depth buffer.
6 glGenFramebuffers(1, &FramebufferName);
7 glBindFramebuffer(GL_FRAMEBUFFER, FramebufferName);
8 std::cout << "FramebufferName==" << FramebufferName << std::endl;
9
10 // Depth texture. Slower than a depth buffer, but you can sample it later in your shader
11 GLuint depthTexture;
12 glGenTextures(1, &depthTexture);
13 glBindTexture(GL_TEXTURE_2D, depthTexture);
14 std::cout << "depthTexture==" << depthTexture << std::endl;
15 glTexImage2D(GL_TEXTURE_2D, 0,GL_DEPTH_COMPONENT, 1024, 1024, 0,GL_DEPTH_COMPONENT, GL_FLOAT, 0);
16 glTexParameteri(GL_TEXTURE_2D, GL_TEXTURE_MAG_FILTER, GL_NEAREST);
17 glTexParameteri(GL_TEXTURE_2D, GL_TEXTURE_MIN_FILTER, GL_NEAREST);
18 glTexParameteri(GL_TEXTURE_2D, GL_TEXTURE_WRAP_S, GL_CLAMP_TO_EDGE);
19 glTexParameteri(GL_TEXTURE_2D, GL_TEXTURE_WRAP_T, GL_CLAMP_TO_EDGE);
20
21 glFramebufferTexture(GL_FRAMEBUFFER, GL_DEPTH_ATTACHMENT, depthTexture, 0);
22
23 glDrawBuffer(GL_NONE); // No color buffer is drawn to.
24
25 // Always check that our framebuffer is ok
26### if(glCheckFramebufferStatus(GL_FRAMEBUFFER) != GL_FRAMEBUFFER_COMPLETE)
27 {
28 std::cout << "glCheckFrambufferStatus == FALSE" << std::endl;
29 return false;
30 }
31 std::cout << "glCheckFrambufferStatus == TRUE" << std::endl;
32 return true;
33 }
To keep moving what I might have to do is just create a shader on an ALLEGRO_BITMAP that draws the depth in RGB. more investigation to continue... EDIT 5 EDIT 6 Camera View: -- |
|
SiegeLord
Member #7,827
October 2006
 |
What's going on here... "For in much wisdom is much grief: and he that increases knowledge increases sorrow."-Ecclesiastes 1:18 |
|
Mark Oates
Member #1,146
March 2001
|
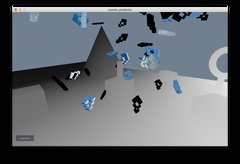
A cacophony of stream-of-concious efforts. When attempting to render to my depth-view, the depth test is somehow exactly flipped. I'm even at the point now where I'm getting glitch art: It looks like the shadows won't arrive for another day. Perhaps my weary body will be better equipped after a nights rest. -- |
|
Gideon Weems
Member #3,925
October 2003
|
|
Mark Oates
Member #1,146
March 2001
|
So, the challenge continues! In discouragement at being unfamiliar with rendering to a strict depth buffer, I decided to just create a simple shader that would draw depth to an ALLEGRO_BITMAP. What I did was pass into the shader the real-world-position of the camera, and calculate distance() to the real-world-position of the vertex. It worked... ish: But why is the floor white? My theory is that since I was calculating the distance to each vertex, glsl was calculating that the four corners of the bottom plane were at a far distance from the camera, and then interpolating those values to fill in the rest of the geometry. At that point I realized that the camera's position is already (0,0,0) in the shader after the al_porjview_matrix is multiplied to the object in the shader, and I could avoid having to calculate a million distance() formulas, which are really slow. And the depth value that I need is already in the 4th component of the shader's gl_Position. I coded it in, and it worked! So much more to do! -- |
|
GullRaDriel
Member #3,861
September 2003
 |
That stuff is pretty cool Mark ! "Code is like shit - it only smells if it is not yours" |
|
Mark Oates
Member #1,146
March 2001
|
Thanks Ok, it looks like I have run into a problem. When drawing to an ALLEGRO_BITMAP that is not the backbuffer (or a subbitmap of the backbuffer), the depth sorting gets all messed up. This is what the scene looks like when drawn per the usual way: Normal: Depth Shader When Drawn On Backbuffer: - Looks good, everything appears to work out. Depth Shader On A Target Bitamp (that is NOT a Backbuffer): - EEKS! I'm not sure what's causing this problem. Any ideas? I'll try it without using a shader. EDIT 1 Normal Drawing on a Target Bitmap (that is NOT a Backbuffer): - Also EEKS! -- |
|
Bruce Pascoe
Member #15,931
April 2015
 |
I'm guessing it's because only the backbuffer has a Z-buffer. A regular bitmap is just a flat matrix of pixels, where would you store the depth info?
|
|
SiegeLord
Member #7,827
October 2006
|
It's possible for a bitmap to have a z buffer, but Allegro provides no means to create this. See https://github.com/liballeg/allegro5/issues/477. "For in much wisdom is much grief: and he that increases knowledge increases sorrow."-Ecclesiastes 1:18 |
|
Mark Oates
Member #1,146
March 2001
|
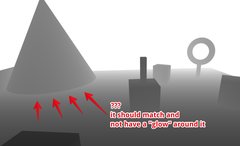
Bruce Pascoe said: I'm guessing it's because only the backbuffer has a Z-buffer. A regular bitmap is just a flat matrix of pixels, where would you store the depth info? Did not know that. SiegeLord said: It's possible for a bitmap to have a z buffer, but Allegro provides no means to create this. See https://github.com/liballeg/allegro5/issues/477. Would use! I was wondering why offscreen bitmaps don't have multi-sampling. Either way... al_set_target_bitmap(backbuffer); setup_projection(light); draw_the_depth_pass(); al_set_target_bitmap(depth_pass_surface); al_draw_bitmap(backbuffer); al_set_target_bitmap(backbuffer); // ... continue on as if nothing happened Nothing will stop me! >:E --- Also, incidentally, I noticed something wrong with the depth image: {"name":"610019","src":"\/\/djungxnpq2nug.cloudfront.net\/image\/cache\/5\/e\/5ed9bfd99b90353c0d61df97ea97252e.png","w":941,"h":575,"tn":"\/\/djungxnpq2nug.cloudfront.net\/image\/cache\/5\/e\/5ed9bfd99b90353c0d61df97ea97252e"} I thought there was something wrong with my depth algorithm, so I looked into it and it turns out the geometry was messed up. The cone was hovering above the plane by about 0.2: So I fixed that: --- Ok. I'm excited to finally have a (sort of) depth map! Next up we should see some semblance of shadows. -- |
|
Bruce Pascoe
Member #15,931
April 2015
|
That hovering cone reminds me of old 90s CGI cartoons (e.g. Beast Wars) where it often looked like the characters were walking just above the ground.
|
|
Mark Oates
Member #1,146
March 2001
|
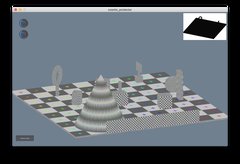
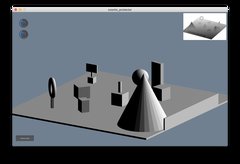
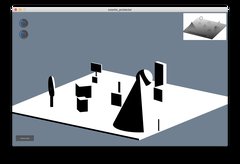
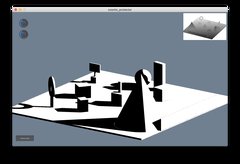
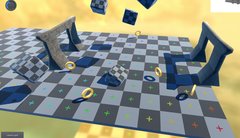
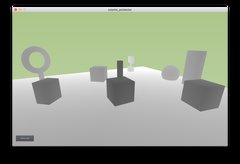
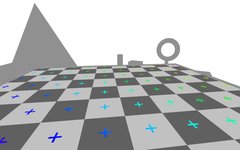
Ok, I owe you guys an update I have achieved semblance of shadows! This was the very first time where all the components are accounted for! {"name":"610023","src":"\/\/djungxnpq2nug.cloudfront.net\/image\/cache\/3\/b\/3bdde501683c89772d8f8f4ddb782497.png","w":1072,"h":734,"tn":"\/\/djungxnpq2nug.cloudfront.net\/image\/cache\/3\/b\/3bdde501683c89772d8f8f4ddb782497"} Everything's all out of wack, but it's all in there. All that's left is to work out the math just inside the shader. I added a bunch of little floating objects to make the depth more palatable. Note that this is not actual shadows mapped, rather it's the depth image just plastered onto the models as if it were a regular plain old texture map. It's cool 'cause if you look at the floor you can see that the rotating logos have "shadows" that are also rotating as well. That's where it all started. After that, I needed to make sure the 0.05 that I multiplied to the depth wouldn't be a problem. {"name":"610025","src":"\/\/djungxnpq2nug.cloudfront.net\/image\/cache\/5\/5\/5581400a6160bb752680d37874f00768.png","w":1072,"h":734,"tn":"\/\/djungxnpq2nug.cloudfront.net\/image\/cache\/5\/5\/5581400a6160bb752680d37874f00768"} Good. Everything is in order. Now it's time to calculate an actual shadow map onto the scene. And finally, without further ado, here is the first image showing an actual shadow projection: {"name":"610026","src":"\/\/djungxnpq2nug.cloudfront.net\/image\/cache\/6\/5\/653de59d8f8b43741cf4b39030ce9efe.png","w":1072,"h":734,"tn":"\/\/djungxnpq2nug.cloudfront.net\/image\/cache\/6\/5\/653de59d8f8b43741cf4b39030ce9efe"} All screwed up. If you look carefully, you can see that the texture is looping for some reason. So somewhere the UV mapping coordinates are scaled incorrectly. So I scale them by some multiple: {"name":"610028","src":"\/\/djungxnpq2nug.cloudfront.net\/image\/cache\/4\/7\/47b33701eed38d4c6ef16abc33ef3f18.png","w":1072,"h":734,"tn":"\/\/djungxnpq2nug.cloudfront.net\/image\/cache\/4\/7\/47b33701eed38d4c6ef16abc33ef3f18"}  At this point I create a bunch of cool abstract art. But it's still a little tough to se what's going on so I put in some crappy texturing to get a better sense of space and depth:  It's so close. ... until next time ... -- |
|
Arvidsson
Member #4,603
May 2004
 |
This is a fun and interesting read! Please never stop ☺
|
|
GullRaDriel
Member #3,861
September 2003
|
Moar ! "Code is like shit - it only smells if it is not yours" |
|
ks
Member #1,086
March 2001
|
This is great and quite like the updates. I would definitely support ($$) an Allegro 3D solution even if free or low cost alternatives exist. Will you consider integrating https://github.com/assimp/assimp for model loading?
|
|
Peter Hull
Member #1,136
March 2001
|
On the other hand, you are 300% over schedule and not finished yet. Work harder, Oates.
|
|
Mark Oates
Member #1,146
March 2001
|
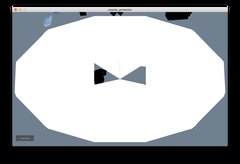
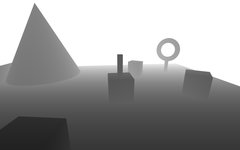
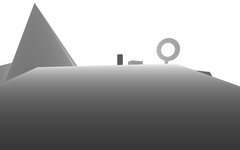
I wanted to add that when trying to correctly align the light texture into the scene, one method I tried was to place the camera and the light at the exact same position. In theory, this would allow me to tinker with the UV position and scale, and see when the shadow projection and scene were in sync:  ^ This is the light and the camera placed and viewing the scene from the exact same position, both are rotating around the scene together in sync.  Looks cool Looks cool  Unfortunately, it didn't prove to be as useful as I had thought so I went back to separate locations. Unfortunately, it didn't prove to be as useful as I had thought so I went back to separate locations.Also, I found out that you cannot make your own variables in GLSL with a gl_* prefix. I tried naming a variable gl_Position_from_light and got this wonderful work of bow tie art: {"name":"610030","src":"\/\/djungxnpq2nug.cloudfront.net\/image\/cache\/c\/2\/c2f20f42e902ab1b24665329980c5306.png","w":1072,"h":734,"tn":"\/\/djungxnpq2nug.cloudfront.net\/image\/cache\/c\/2\/c2f20f42e902ab1b24665329980c5306"} and an error message that read ERROR: 0:13: Identifier name 'gl_Position_from_light' cannot start with 'gl_' Anyway, that's all in the past. --- This is where we are now. As you can see by the end of the video, we're so close!  Ahgh! So close you can almost taste it! If you look closely at how the shadows are distorting, you can see that all the shadows seem to be bending inward towards the back, rather than outward. I think the reason is because I am using a perspective projection for the light, when I should be using an orthographic projection. It's as if the shadows at the center are OK, but further on the edge of the camera, they seem to bend in and shrink towards the back, like what would happen in a perspective projection. So, if I "unproject" that perspective distortion... Eh? What do you think? -- |
|
SiegeLord
Member #7,827
October 2006
|
I dunno, if you're simulating nearby a point light, then a projective transformation makes sense. If you're simulating a far away light, then orthographic would be fine. "For in much wisdom is much grief: and he that increases knowledge increases sorrow."-Ecclesiastes 1:18 |
|
Gideon Weems
Member #3,925
October 2003
|
Mark Oates said: ERROR: 0:13: Identifier name 'gl_Position_from_light' cannot start with 'gl_' What sort of pre-processor magic makes this possible? It reminds me of printf-related warnings. The pre-processor sometimes comments about invalid format strings. Will you be able to do this in real time? |
|
Bruce Pascoe
Member #15,931
April 2015
|
I always assumed it was the compiler that generated the printf warnings. In that case it's just a matter of looking at the arguments of a printf() call--since the compiler already knows how to read the grammar--and parsing the format string. I would assume it's similar to how JS treats eval() differently depending on whether it's actually called as "eval" versus through an alias.
|
|
Peter Hull
Member #1,136
March 2001
|
Quote: And he answered them not, but raised his eyes to the heavens, saying "Tonight, there will be shadows, threads shall be locked, and Phipps shall return." From the Gospel of St Mark of Oates, 12:28
|
|
Bruce Pascoe
Member #15,931
April 2015
|
Who is this Phipps guy anyway?
|
|
Mark Oates
Member #1,146
March 2001
|
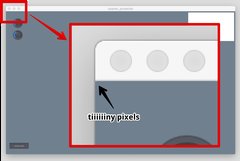
OK! Just got back from a wedding cruise and have had time to work on this puppy. I won't reveal to the end, but things are working and the shadows are straight up sexy. {"name":"610039","src":"\/\/djungxnpq2nug.cloudfront.net\/image\/cache\/9\/1\/919015bc88e1531f2762f3b98e1d92c1.gif","w":320,"h":240,"tn":"\/\/djungxnpq2nug.cloudfront.net\/image\/cache\/9\/1\/919015bc88e1531f2762f3b98e1d92c1"} SiegeLord said: I dunno, if you're simulating nearby a point light, then a projective transformation makes sense. If you're simulating a far away light, then orthographic would be fine. A perspective transform should work. In the tutorial, it uses a ortho transform, but there is another later section that says if you want to use a perspective transform then (...) and I didn't read that part. So, I dove into trying to fix it by switching back to ortho and it worked. Sort of. Part 1: Getting to the Orthographic ProjectionIt took awhile to get the ortho transform in place, since you can't just simply swap out al_perspective_transform with al_orthographic_transform. Here's what it looked like when I just swapped them out: {"name":"610040","src":"\/\/djungxnpq2nug.cloudfront.net\/image\/cache\/3\/2\/325764e7f3f265cf3cedae492d098931.png","w":2088,"h":1412,"tn":"\/\/djungxnpq2nug.cloudfront.net\/image\/cache\/3\/2\/325764e7f3f265cf3cedae492d098931"} When I looked closer, I could see these tiiiiiiiiny pixels in the top left of the frame, which happens to be the whole scene: {"name":"610041","src":"\/\/djungxnpq2nug.cloudfront.net\/image\/cache\/3\/d\/3d9c20c9baa9479e8af8346d93921211.png","w":1761,"h":1184,"tn":"\/\/djungxnpq2nug.cloudfront.net\/image\/cache\/3\/d\/3d9c20c9baa9479e8af8346d93921211"} The whole scene be about 10 'units' wide in geometry, which in iso projection is about 10 pixels. So, I had to scale it up and center it to match the view I had previously: {"name":"610042","src":"\/\/djungxnpq2nug.cloudfront.net\/image\/cache\/2\/9\/29fd0732ac80de482dfc1f28147ae4c7.png","w":1072,"h":734,"tn":"\/\/djungxnpq2nug.cloudfront.net\/image\/cache\/2\/9\/29fd0732ac80de482dfc1f28147ae4c7"} Awesome. I ended up using the exact same ortho projection for the light and the scene, but from different viewing angles. That way I wouldn't have to worry about possible inconsistencies when merging the two projections for a shadow. Ok, here's the interesting part. Notice that in the upper right corner (that's the light's view depth map) that the entire scene is black? This happened when I switched to ortho mode. Something new is up with the depth z-values, so I tried a bunch of different things to see what I could get out of the pixel data. I tried curving the brightness of the colors in a bunch of different ways... {"name":"610045","src":"\/\/djungxnpq2nug.cloudfront.net\/image\/cache\/5\/0\/504d0ad0c7f3b899178d8f619cb611fd.png","w":390,"h":250,"tn":"\/\/djungxnpq2nug.cloudfront.net\/image\/cache\/5\/0\/504d0ad0c7f3b899178d8f619cb611fd"} ...but found out that the z values were all flat 0.0. Not sure what to do next, I tried just on a whim drawing only using the green color component (e.g. rgba(color.g, color.g, color.g, 1.0) ) and this came out: {"name":"610043","src":"\/\/djungxnpq2nug.cloudfront.net\/image\/cache\/5\/1\/51736cd62cf09204188e0cbe1b2929b0.png","w":396,"h":250,"tn":"\/\/djungxnpq2nug.cloudfront.net\/image\/cache\/5\/1\/51736cd62cf09204188e0cbe1b2929b0"} Well that's kinda strange. Previously, I was only using the color.a component, since the z-value for the pixel is stored in there (e.g. rgba(color.a, color.a, color.a, 1.0) ). Why now, would the green value just produce a simple gradient? So I investigated further and drew the image with proper colors rgba(color.r, color.g, color.b, 1.0): {"name":"610044","src":"\/\/djungxnpq2nug.cloudfront.net\/image\/cache\/8\/2\/825b3b086a6f53e28185958cf2e761e6.png","w":386,"h":248,"tn":"\/\/djungxnpq2nug.cloudfront.net\/image\/cache\/8\/2\/825b3b086a6f53e28185958cf2e761e6"} Strange again, I'm not sure what's going on in this picture... but... if you look reeeeeealy closely, you can see some very faint shapes in the RGBA render. Very very faint, and they appear to be in the blue part of the image.
{"name":"610046","src":"\/\/djungxnpq2nug.cloudfront.net\/image\/cache\/a\/1\/a14b6f39d7ecb193a1f67fbdbc024666.png","w":386,"h":248,"tn":"\/\/djungxnpq2nug.cloudfront.net\/image\/cache\/a\/1\/a14b6f39d7ecb193a1f67fbdbc024666"} With a bit of texture position tweaking, the shadow mapping lines up! {"name":"610047","src":"\/\/djungxnpq2nug.cloudfront.net\/image\/cache\/d\/e\/dec51f7ad187aadb39c1fb90213509a8.png","w":2144,"h":1468,"tn":"\/\/djungxnpq2nug.cloudfront.net\/image\/cache\/d\/e\/dec51f7ad187aadb39c1fb90213509a8"} When everything is lined up there's really bad "shadow acne" but who cares!! It works!!!
Part 2: Getting Rid of the NoiseThe hard part is over, from this point on it's a battle of filtering out shadow noise, and I ended up using a solution of my own (not mentioned in the tutorial). Quote: Will you be able to do this [en.wikipedia.org] in real time? Funny you mentioned that actually. As I was trying to figure out shadows, it was a bit difficult to see what was going on with the checker texture (because of that exact "checker shadow illusion") so I swapped out with a grass texture. By filtering out for the "shadow acne" noise, at best I was able to get it to look like this: {"name":"610051","src":"\/\/djungxnpq2nug.cloudfront.net\/image\/cache\/9\/b\/9b45cb1f05ba2048a93c64e20f0df9c5.png","w":2144,"h":1468,"tn":"\/\/djungxnpq2nug.cloudfront.net\/image\/cache\/9\/b\/9b45cb1f05ba2048a93c64e20f0df9c5"} and at worst it looked like this: {"name":"610050","src":"\/\/djungxnpq2nug.cloudfront.net\/image\/cache\/1\/c\/1cf54b72c86767024373f9bf21aef071.png","w":2144,"h":1468,"tn":"\/\/djungxnpq2nug.cloudfront.net\/image\/cache\/1\/c\/1cf54b72c86767024373f9bf21aef071"} If you look closely, the worst-case-scenario-stripes-pattern is isolated to geometry that is facing away from the light, so to catch this case I ended up using a combination of plain-old-school shading combined with the casted shadows. Here's the scene rendered with plain-old-school shading. This uses the light's point as the source and does not have a falloff for distance. Essentially, a plane is brighter when it's facing the light, and darker as it turns away: {"name":"610049","src":"\/\/djungxnpq2nug.cloudfront.net\/image\/cache\/a\/d\/ad5d4226c6e0f5c52458447a0a3b668a.png","w":2144,"h":1468,"tn":"\/\/djungxnpq2nug.cloudfront.net\/image\/cache\/a\/d\/ad5d4226c6e0f5c52458447a0a3b668a"} Then I curve it, so it's either black or white. Anything above 0.5 is pushed to 1.0 and anything below it is pushed to 0.0. Looks like this: {"name":"610052","src":"\/\/djungxnpq2nug.cloudfront.net\/image\/cache\/e\/1\/e1fd1a06674fadabb496d17469aad88e.png","w":2144,"h":1468,"tn":"\/\/djungxnpq2nug.cloudfront.net\/image\/cache\/e\/1\/e1fd1a06674fadabb496d17469aad88e"} Then I combine this shading data with the previous shadow map, using only the darkest colors (works by simply multiplying color1 * color2). Looks like this: {"name":"610053","src":"\/\/djungxnpq2nug.cloudfront.net\/image\/cache\/d\/d\/ddf07087cf8e8fcc09def2f6e4e252d2.png","w":2144,"h":1468,"tn":"\/\/djungxnpq2nug.cloudfront.net\/image\/cache\/d\/d\/ddf07087cf8e8fcc09def2f6e4e252d2"} All I have to do now is nicely blend the shadow with the normal shading of the scene and... {"name":"610054","src":"\/\/djungxnpq2nug.cloudfront.net\/image\/cache\/a\/3\/a38c86de60c12dffc6dd73bc58d82de1.png","w":2144,"h":1468,"tn":"\/\/djungxnpq2nug.cloudfront.net\/image\/cache\/a\/3\/a38c86de60c12dffc6dd73bc58d82de1"} ...that is the first actual fully properly shadow mapped scene. And, it turns out that when I change the camera's projection to perspective, it worked without a hitch!! {"name":"610055","src":"\/\/djungxnpq2nug.cloudfront.net\/image\/cache\/3\/e\/3e7e0f06aeee66f34b812a9cc7857c9e.png","w":2144,"h":1468,"tn":"\/\/djungxnpq2nug.cloudfront.net\/image\/cache\/3\/e\/3e7e0f06aeee66f34b812a9cc7857c9e"} (notice it renders the skybox now that the projection is perspective.) Part 3: The FutureI started combining the shadows with different colors, and several different materials and shaders:  Things are starting to get serious: {"name":"610058","src":"\/\/djungxnpq2nug.cloudfront.net\/image\/cache\/1\/b\/1b9068ce0865585b9a43c2b6b38083b7.png","w":1642,"h":946,"tn":"\/\/djungxnpq2nug.cloudfront.net\/image\/cache\/1\/b\/1b9068ce0865585b9a43c2b6b38083b7"}
-- |
|
Bruce Pascoe
Member #15,931
April 2015
|
That last shot looks awesome. Who knew Allegro could do full 3D (as opposed to 2.5D)? Not me!
|
|
GullRaDriel
Member #3,861
September 2003
|
Mark you rock. Edit: This really is awesome. "Code is like shit - it only smells if it is not yours" |
|
|
1
2
|

 :
:


 I multiplied when I should have divided.